How to Set Up Neck Training Equipment: The Definitive 2026 Safety Guide
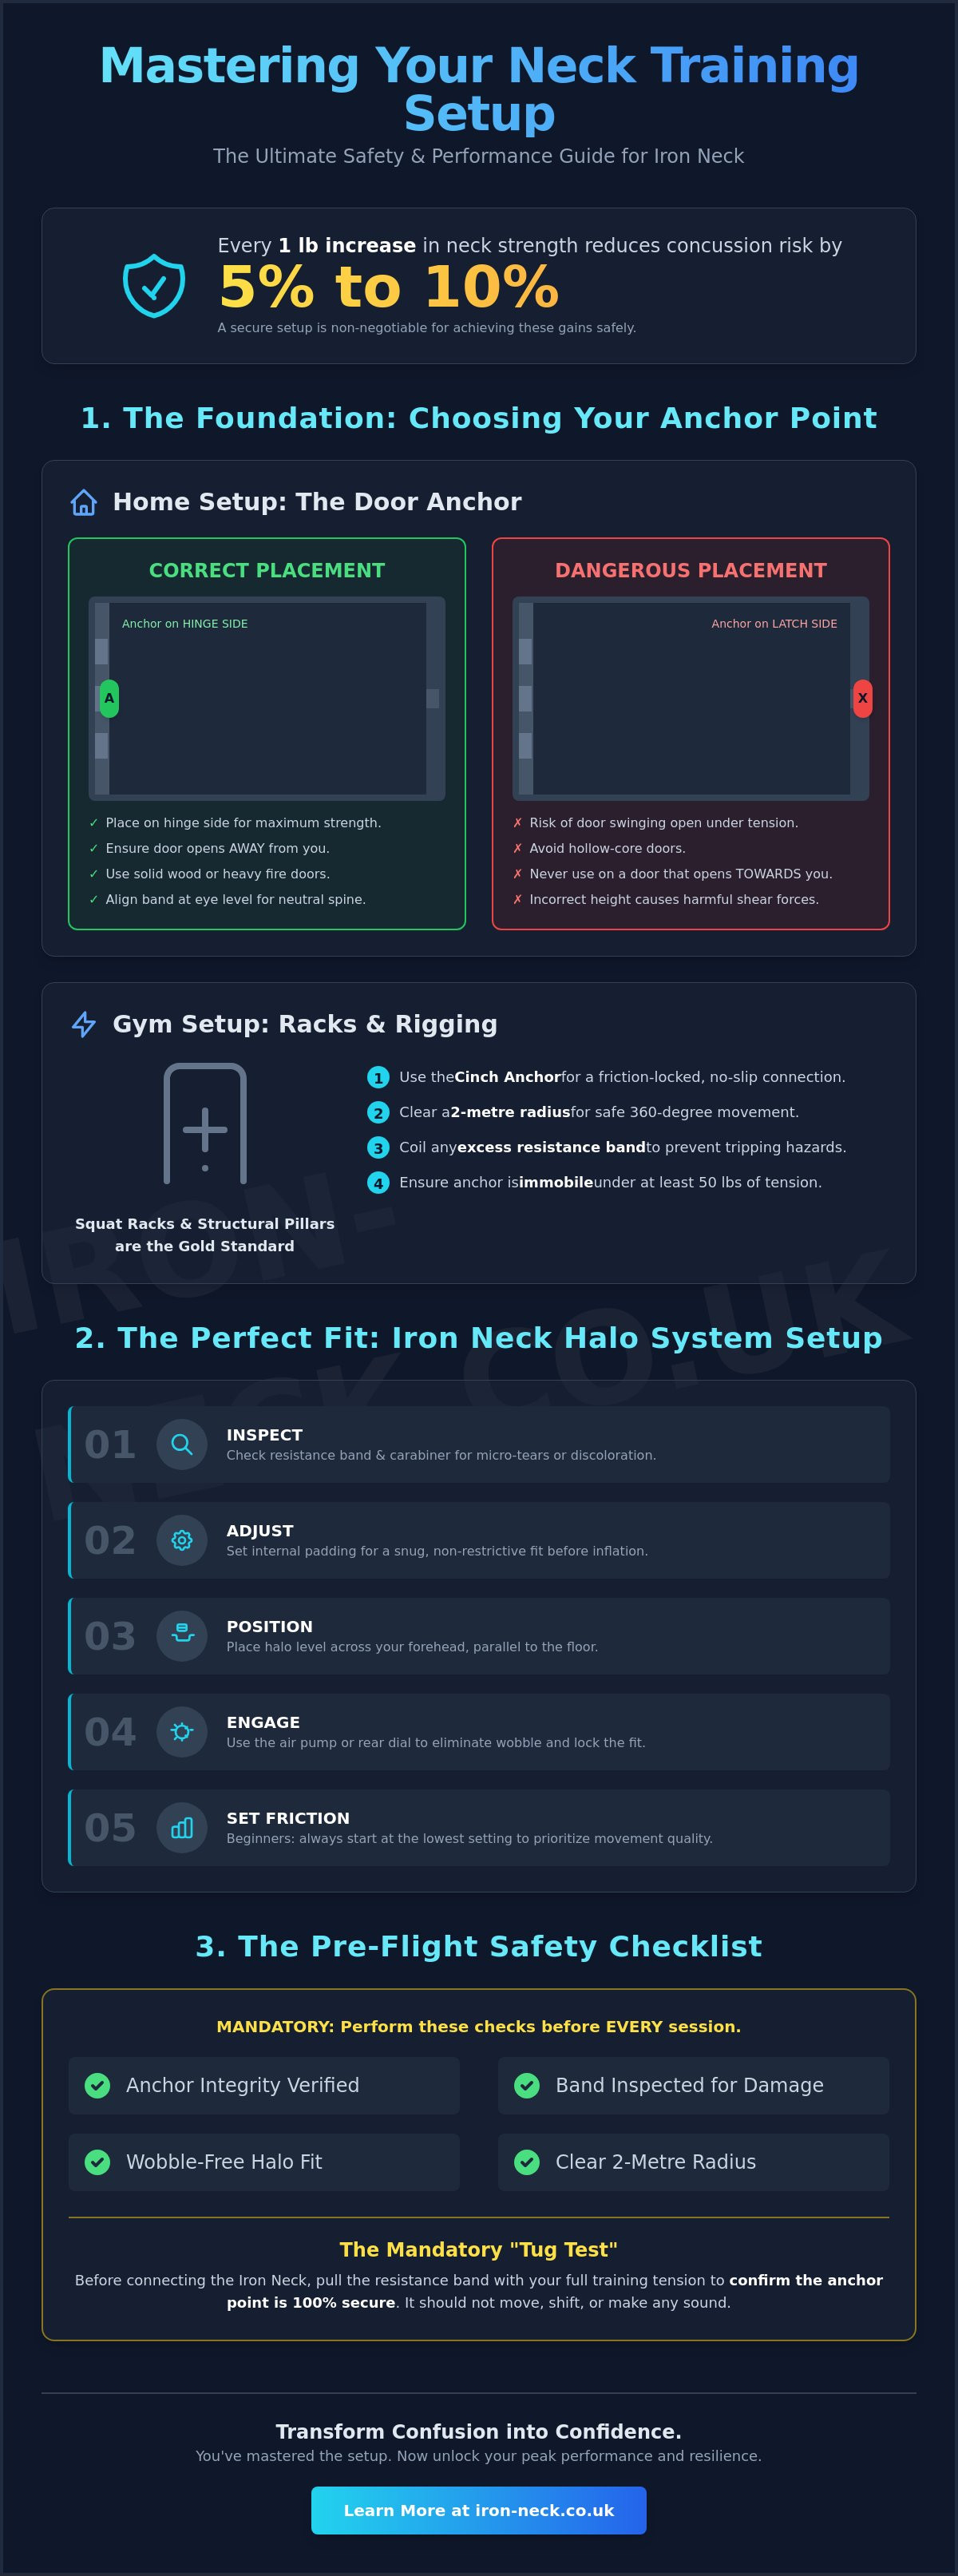
Every one-pound increase in your neck strength reduces your concussion risk by 5 to 10 percent. That's a powerful statistic, but those gains depend entirely on the mechanical precision of your foundation. You've likely realized that the missing link in your performance isn't just the gear; it's knowing how to set up neck training equipment with absolute certainty. It's normal to feel a sense of hesitation when anchoring a device to your cervical spine. You want to ensure that your Iron Neck 3.0 or 3.0 Pro doesn't wobble or slip during a high-tension rotation.
We agree that safety isn't an area where you can afford to guess. This guide promises to transform your confusion into expertise by mastering the secure setup of anchors and harnesses for elite-level performance. You'll learn how to differentiate between a cinch and door anchor while achieving a fit so secure it feels like an extension of your body. We're going to preview the exact steps to create a rock-solid training environment, giving you the confidence to start your first session with total peace of mind.
Key Takeaways
- Identify the most secure anchor points in your facility by prioritizing load-bearing structures and non-negotiable hinge-side door placement.
- Learn how to set up neck training equipment with surgical precision by adjusting internal padding for a wobble-free fit and inspecting resistance bands for micro-tears.
- Eliminate lateral strain on the cervical spine by centering harness loads and ensuring proper ear clearance for maximum stability.
- Execute a mandatory "Tug Test" before every session to verify the integrity of your anchor point under full training tension.
- Bridge the gap between setup and performance by mastering low-friction rotational movements that build foundational durability.
Choosing Your Environment: Anchoring Neck Training Equipment Safely
Elite performance requires more than just high-end gear; it demands a fail-safe environment. Mastering how to set up neck training equipment begins with the anchor point. Whether you are in a professional facility or a home gym, the structural integrity of your anchor determines the safety of your cervical spine. A squat rack is the gold standard for stability, but door frames are a viable alternative if you follow strict mechanical protocols. You must ensure the anchor point is completely immobile under a minimum of 50 pounds of horizontal tension. While there are many types of neck training equipment available, the Iron Neck system requires a fixed point that eliminates all environmental variables.
The door anchor is a masterpiece of convenience, but its safety is non-negotiable. You must always place the anchor on the hinge side of the door. This is the strongest part of the frame. Placing it on the latch side risks the door swinging open under tension, which could lead to a rapid, uncontrolled recoil. Once the anchor is positioned, calibrate the height so the resistance band aligns perfectly with your eye level. This alignment ensures you maintain a neutral spine throughout the movement. If the anchor is too high or too low, you introduce unwanted shear forces that compromise your stabilizer muscles.
Home Setup: Navigating UK Door Standards
UK internal doors present unique challenges compared to heavy-duty industrial doors. Many modern UK homes utilize hollow-core doors that lack the density required for high-tension resistance work. Before you begin, perform a visual inspection of the frame and hinges. Look for any signs of wood rot or loose screws. We recommend using heavy fire doors or solid wood external doors for maximum security. Always ensure the door opens away from you. This orientation uses the door frame itself as a physical stop, providing an extra layer of protection against accidental unlatching during explosive movements.
Gym Setup: Utilizing Racks and Rigging
When training in a commercial gym, squat racks and structural pillars are your best options. Use the cinch anchor to create a friction-locked connection that won't slide vertically during your sets. If the cinch anchor slides even an inch, it changes the angle of resistance and disrupts your proprioception. Clear a 2-metre radius around your station to ensure unobstructed 360-degree movement. This space is essential for performing the "Look-Look" and other rotational protocols safely. Finally, coil any excess resistance band length. A clean workspace prevents tripping hazards and keeps your focus entirely on the quality of your repetitions.
Setting Up the Iron Neck: The Precision Halo System
Precision is the hallmark of elite performance. Unlike traditional equipment that relies on gravity or linear resistance, the Iron Neck 3.0 and 3.0 Pro utilize a sophisticated halo system designed for 360-degree stabilization. Learning how to set up neck training equipment correctly is the foundation of your injury prevention strategy. This process begins with a methodical five-step protocol to ensure the device functions as a true extension of your cervical spine.
- Step 1: Inspect the resistance band and carabiner connections. Look for discolouration or micro-tears in the fabric sleeve.
- Step 2: Adjust the internal padding. The device should feel snug but not restrictive before you even engage the air system.
- Step 3: Position the halo level across your forehead. It must sit parallel to the floor to ensure the resistance remains centered.
- Step 4: Engage the air pump or rear dial. This eliminates internal movement and locks the device to your skull's unique geometry.
- Step 5: Set the friction dial. For beginners, this should always remain at the lowest setting to prioritize movement quality over load.
While many athletes look for expert tips for neck harness use, the Iron Neck requires a more nuanced approach to variable resistance. The goal is to create a seamless interface between the machine and your stabilizer muscles. If the device shifts during a rotation, you lose the "Missing Link" of constant tension that makes this equipment so effective.
Mastering the Air Fit and Dial System
The air fit system is your primary tool for eliminating "wobble." A loose fit causes the halo to lag behind your head's movement, which can lead to jarring impacts on the cervical spine. Pump the bulb until the internal bladder provides firm, even pressure around the circumference of your head. You don't want pressure points; you want total surface contact. If you have a smaller head size, utilize the interchangeable pad kits included with your Iron Neck 3.0 to fill the gap before pumping. Start your friction setting at zero. Mastering the "Look-Look" and "Figure 8" movements with no friction allows you to build the proprioception necessary for higher loads later.
Connecting to the Resistance Source
Safety is confirmed by the sound of a click. Perform the "click-test" by physically tugging on the carabiners once they are gated to ensure they are fully locked. When you start your session, maintain a distance of 2 to 3 steps from your anchor point. This creates a baseline tension that prevents the band from going slack at the end of a movement. Never use a band that shows signs of fraying or elastic fatigue. A snapped band under tension is a significant safety risk that can be avoided with a ten-second visual check. Once your connections are verified, you can focus on optimizing your neck training setup for maximum results.
Traditional Head Harness Setup and Loading Protocols
While the Halo system provides unmatched rotational resistance, the Alpha Head Harness is the definitive tool for building foundational linear power. Mastery of how to set up neck training equipment in this category requires a deep respect for gravity. Unlike the variable resistance of bands, a plate-loaded harness exerts a constant downward force that must align perfectly with your center of gravity. Misalignment by even a few millimeters can lead to uneven loading on the cervical vertebrae, which is why a methodical approach to the fitting process is your first line of defense against injury.
Securing the Alpha Harness for Stability
A secure fit is the difference between a productive session and a dangerous distraction. Start by adjusting the crown strap so the side D-rings sit approximately one inch above your ears. This positioning ensures that the line of pull doesn't interfere with your jaw or compress your ear cartilage during heavy extensions. Tighten the industrial-grade Velcro straps until the harness feels like a molded part of your skull. There should be zero sliding when you move your head. The interior moisture-wicking lining is designed to maintain this friction-lock even during high-intensity sessions where sweat usually compromises equipment stability.
Safe Plate Loading and Chain Management
Physics dictates that the load must be centered to prevent lateral neck strain. Thread the heavy-duty chain through the center of your weight plates and ensure the carabiner is clipped securely to both D-rings of the harness. This creates a balanced "V" shape that distributes the weight evenly across the sagittal plane. Before you engage the load, establish a neutral spine position. You must avoid the "turtling" effect where the chin tucks too aggressively. Use a mirror or a qualified spotter during your first few sessions to verify that your head remains in a stacked position over your shoulders as you take the weight.
Progressive overload in neck training is a game of millimeters and grams, not kilograms. For 2026 safety protocols, we mandate using small increments of 1.25kg to 2.5kg. The cervical spine's stabilizer muscles are highly responsive but also delicate; jumping by 5kg or 10kg is a common mistake that leads to acute strain. By focusing on micro-loading, you allow the connective tissues to adapt at the same rate as the primary movers. If you can't maintain a perfectly neutral spine for the duration of a 10-repetition set, the load is too heavy. Back off, reset your posture, and prioritize the integrity of the movement over the number on the plate. This methodical discipline is what separates elite athletes from those sidelined by avoidable injuries.
The Safety Checklist: Pre-Flight Essentials
Professional pilots never leave the tarmac without a pre-flight checklist; elite athletes should treat their cervical spine with the same level of discipline. Mastering how to set up neck training equipment requires more than just connecting parts; it requires a systematic verification of every mechanical link. Before you apply a single pound of tension, you must execute a four-point safety protocol to ensure your environment and equipment are prepared for high-performance loads. This discipline eliminates the anxiety of equipment failure, allowing you to focus entirely on your stabilizer muscles.
- The 'Tug Test': Once your anchor is set, grasp the resistance band or chain and lean back with your full body weight. This verifies that the door frame or squat rack is truly load-bearing before the device is on your head.
- Visual Inspection: Examine the resistance bands for micro-tears or discolouration. On the Iron Neck 3.0, check the halo for any hairline cracks in the high-impact polymer.
- Range of Motion Check: Perform a full 360-degree rotation without any friction or band tension. This ensures your clothing or hair won't snag on the swivel mechanism during the set.
- Environmental Scan: Confirm you have cleared your 2-metre training radius. Remove any loose gym tiles, stray dumbbells, or trip hazards that could disrupt your balance.
Mechanical Integrity Checks
A snapped resistance band can recoil at speeds exceeding 60 feet per second, posing a severe risk of facial or ocular injury if the sleeve integrity is compromised. Beyond the bands, you must inspect the swivel mechanism on your Iron Neck to ensure smooth, silent 360-degree rotation. If you feel any grinding or resistance within the halo itself, stop immediately. Finally, verify the 'gate-lock' on all carabiners. A carabiner that isn't fully gated can fail under as little as 30% of its rated capacity, turning a secure setup into a mechanical hazard. Ensure the screw-gate is tight and the spring-loaded arm is fully flush against the hook.
Personal Readiness and Posture Alignment
Your body is the final piece of the setup. Establish a wide, 'Athletic Stance' with your knees slightly bent and your core engaged. This foundation prevents your torso from swaying, which ensures the neck muscles, rather than your lower back, are doing the work. Follow the 'Chin Tuck' rule: pull your chin slightly back to align your ears over your shoulders, maintaining a neutral cervical spine. This posture is critical for preventing the shear forces that lead to long-term wear. If you hear sharp 'clicks' or feel shooting pains during this setup phase, it's a signal to abort the session and consult a professional. Safety isn't a suggestion; it's the foundation of performance. To ensure you have the most reliable gear for your checklist, upgrade to professional-grade neck training equipment today.
Integrating Your Equipment: From Setup to Performance
Once the hardware is locked and your pre-flight checklist is complete, the focus shifts from mechanical assembly to biomechanical integration. Successfully learning how to set up neck training equipment is only the first half of the equation. The second half is the "Missing Link": executing the transition from a static setup to dynamic movement without compromising the cervical spine. Your first session shouldn't be about testing your strength limits; it's about calibrating your proprioception and ensuring the device moves in perfect synchronicity with your head.
The first movement every athlete must master is the 'Look-Look' protocol with zero friction. This involves rotating your head from left to right while maintaining a perfectly level halo. By starting with no added friction, you ensure that your stabilizer muscles are managing the band tension rather than fighting the device itself. Only after you can complete 3 sets of 10 controlled repetitions without the halo tilting should you consider transitioning from linear movements to complex rotational training. This methodical progression prevents the erratic compensation patterns that lead to sub-occipital strain.
Adopting a 'less is more' philosophy during the first 14 days is non-negotiable for long-term durability. While your primary movers might feel capable of more, the connective tissues of the neck require a slower adaptation period than larger muscle groups like the quads or glutes. Limit your initial sessions to 10 minutes, three times per week. This conservative volume allows you to identify any technical flaws in your setup before they manifest as chronic soreness. For those ready to advance, the Iron Neck UK & Europe training ecosystem provides a comprehensive library of advanced protocols designed for elite-level concussion resistance and postural correction.
Your First 10 Minutes of Training
Begin your journey with isometric holds. Stand in your athletic stance and simply hold your head in a neutral position against the band's pull for 30 seconds from four different angles. This builds the foundational stability required for dynamic work. Follow this with slow, controlled eccentric movements, where you resist the band's pull as you return to center. This phase of the movement is where the most significant strength gains occur. To optimize your routine, read our guide on How to Use The Iron Neck for Maximum Results.
Maintenance and Long-Term Care
Elite equipment requires elite maintenance. Sweat is naturally corrosive; if left on the internal padding or the friction dial, it will cause material degradation over time. Wipe down the halo and the Alpha Harness with a non-abrasive, moisture-wicking cleaner after every session. Proper storage is equally critical for safety. Resistance bands are made of high-grade latex that can become brittle when exposed to UV light. Store your bands in a cool, dark environment to prevent the micro-cracks that lead to snap-back failures. If you need to replace worn components or expand your kit, explore our full range of professional neck training accessories to maintain the highest safety standards in your facility.
Build Your Foundation for Elite Performance
The transition from a standard workout to an elite training regimen depends entirely on the integrity of your foundation. By internalizing these protocols for structural anchoring, air-fit stabilization, and methodical plate loading, you've eliminated the variables that compromise safety. Learning how to set up neck training equipment is the technical gateway to unlocking the "Missing Link" in your athletic development. You are no longer just exercising; you're engineering a more resilient version of yourself based on biomechanical certainty.
Iron Neck UK & Europe remains dedicated to providing the scientific tools required for this transformation. Our technology is currently utilized by Premier League and England Rugby teams to achieve measurable concussion risk reduction. With our dedicated UK-based support and fast shipping, you have immediate access to the same equipment used at the highest levels of professional sport. Upgrade your training with the Iron Neck 3.0 Pro and start building your foundation today. Your commitment to safety is the first step toward achieving peak physical potential.
Frequently Asked Questions
Is it safe to set up an Iron Neck on a standard UK door?
Yes, it is safe provided you use a solid-core door or a heavy fire door. Avoid the 35mm hollow-core internal doors common in UK housing because they lack the structural density to handle 50 pounds of horizontal tension. Always anchor to the hinge side of the frame to ensure the load is absorbed by the most stable part of the doorway.
Can I use any resistance band with my neck training equipment?
No, you should only use sleeved resistance bands designed specifically for this purpose. Unprotected latex can degrade 40% faster when exposed to skin oils and UV light. The protective sleeve on professional bands prevents a dangerous "snap-back" effect if the internal elastic fails, which is a critical safety requirement for elite performance standards.
How high should I position the anchor point for the Iron Neck?
Position the anchor point exactly at eye level to ensure a neutral cervical spine alignment. Maintaining this specific height is the most important part of how to set up neck training equipment safely. If the anchor is even 5cm too high or low, it creates unwanted shear forces that can lead to muscle strain rather than strengthening.
What happens if the internal padding doesn't fit my head shape?
Use the interchangeable pad kits included with the Iron Neck 3.0 to customize the internal diameter. These pads come in varying thicknesses to accommodate different skull geometries. Once the pads are in place, engage the air pump system to eliminate any remaining "wobble," ensuring the device moves in perfect synchronicity with your head.
Do I need a partner to help me set up a neck harness?
A partner isn't required, but you should use a mirror for your first 5 sessions. A mirror allows you to verify that the weight plate is perfectly centered on the chain. Proper alignment prevents lateral strain and ensures the load is distributed evenly across the sagittal plane, which is vital when you are first learning how to set up neck training equipment.
How often should I inspect my neck training equipment for wear and tear?
Perform a visual inspection before every single training session without exception. Check the resistance bands for micro-tears and the halo for hairline cracks or structural stress marks. Industry data suggests that 90% of equipment failures are preventable by identifying these early warning signs during a standard 30-second pre-flight check.
Can I use the equipment if I have a history of cervical spine issues?
You must consult a doctor or physical therapist before starting if you have a history of disc herniation or fractures. While this equipment is used by 100% of NFL teams for injury prevention, training with an existing pathology requires a clinical diagnosis. A professional can help you establish a safe, isometric-based progression plan.
What is the best way to store my Iron Neck to ensure it lasts?
Store your equipment in a climate-controlled environment away from direct sunlight and extreme temperatures. UV exposure can cause the polymer halo and latex bands to become brittle within 12 months if left near a window. Coil the resistance bands loosely rather than keeping them under tension to preserve the elastic memory of the material.