How to Measure Neck Strength Progress: A Scientific Guide to Tracking Gains
Most athletes spend hundreds of pounds on wearable tech to track their heart rate and sleep, yet they leave the most critical component of their physical protection, the cervical spine, to complete guesswork. Research in the Journal of Primary Prevention indicates that for every 1lb increase in neck strength, concussion risk decreases by 5%. If you aren't tracking your numbers, you're essentially gambling with your safety. You've likely felt the frustration of a training block where progress feels entirely subjective. Without hard data, it's impossible to know if your neck stabilizers are actually becoming more resilient or if you're simply hitting a plateau.
We agree that "feeling stronger" isn't a reliable metric for elite performance. You deserve a repeatable, scientific framework that validates your hard work and equipment investment. This guide will teach you exactly how to measure neck strength progress using clinical-grade protocols and objective athletic testing. We'll examine the specific methods for quantifying linear and rotational force production, providing you with a clear roadmap to track injury risk reduction and ensure every session drives measurable results.
Key Takeaways
- Establish a scientific baseline to eliminate guesswork and ensure your cervical spine is optimised for elite force absorption and injury prevention.
- Learn how to measure neck strength progress using a combination of linear load tracking and advanced "Time Under Tension" metrics for isometric stability.
- Perform a comprehensive "Tech Neck" audit to quantify improvements in postural alignment, rotational fluidity, and end-range comfort over time.
- Implement a structured five-step logging framework to organise training data and reveal critical patterns in your performance across all planes of movement.
- Leverage the Iron Neck’s variable friction system to provide the missing link in obtaining precise, 360-degree feedback on your functional gains.
The Importance of Establishing a Neck Strength Baseline
Most athletes track their bench press or 5k times with clinical precision, yet they leave neck training to guesswork. This lack of data is a major oversight. Without a clear starting point, you're likely to hit a plateau or sustain a cervical injury. Understanding how to measure neck strength progress begins with a quantified baseline. This data acts as the missing link for your performance. Engaging in regular physical exercise that specifically targets the cervical spine creates a foundation for all movement. Objective data doesn't just track growth; it builds the psychological confidence required to enter a tackle or a scrum knowing your body can handle the load.
Guessing your strength levels leads to inefficient training cycles. If you don't know your starting point, you can't calculate progressive overload. This often results in athletes using too much weight too soon, which puts the delicate structures of the neck at risk. By recording your initial pain-free load, you establish a safety ceiling that guides every subsequent session.
The Science of Concussion Resistance
The relationship between neck girth and injury prevention is backed by rigorous data. A 2014 study published in the Journal of Primary Prevention found that for every one-pound increase in neck strength, concussion risk decreases by 5%. This isn't merely about muscular size; it's about G-force reduction. Effective neck stiffness is the ability to brace before impact. Measuring your progress is a non-negotiable safety requirement for any high-impact sport. It ensures your stabilizer muscles can effectively dissipate energy before it reaches the brain.
Identifying Your Starting Point
You can't optimise what you don't measure. Start by assessing your cervical range of motion (ROM) without any equipment. Use a mirror or a partner to check if you can rotate your head 90 degrees to each side or touch your chin to your chest without discomfort. Once you've established your ROM, record your initial isometric hold times in four primary directions: flexion, extension, and left/right lateral flexion.
- Flexion: Chin tucked, resisting forward movement.
- Extension: Head neutral, resisting backward force.
- Lateral Flexion: Ear to shoulder, resisting side-to-side displacement.
- Rotation: Looking over the shoulder against resistance.
Identifying weak links in lateral flexion or rotation early on is vital. Many athletes discover they have a 20% strength deficit on one side, which is a significant predictor of future injury. Learning how to measure neck strength progress through these initial tests allows you to build a bespoke programme that addresses these imbalances before they become liabilities. Use a stopwatch to record holds to the nearest second and a simple notebook to log your starting weights. This methodical approach transforms neck training from an afterthought into a professional-grade performance strategy.
Quantitative Metrics: Tracking Load and Resistance
Quantifying your gains is the only way to ensure you aren't spinning your wheels. To understand how to measure neck strength progress, you must move beyond "feeling the burn" and start recording objective data. Traditional linear strength is often measured using a head harness and weight plates. While effective, this method requires extreme precision. A clinical review of neck strength testing highlights that while dynamic movements are valuable, they must be controlled to avoid shear force on the cervical spine. If you're using plates, record the exact weight in kilograms and the number of controlled repetitions to the second.
Isometric protocols offer a safer, more stable alternative for many athletes. Here, you track Time Under Tension (TUT). If you held a 5kg load for 30 seconds last week and achieved 35 seconds today, that's a measurable 16% increase in capacity. When using resistance bands, quantify the tension by marking your distance from the anchor point on the floor. A 0.5-metre increase in distance with the same band thickness represents a significant jump in resistance that you can log in your training diary.
Never attempt a One Rep Max (1RM) for the neck. The cervical spine is a complex structure of seven small vertebrae and delicate ligaments. The risk of ligamentous injury or disc herniation from a 1RM attempt far outweighs the benefit of knowing your absolute maximum. Focus on sub-maximal loads and high-quality repetitions. High-performance neck training is about resilience and stability, not ego-driven lifting numbers.
Progressive Overload in Neck Training
Small jumps lead to massive results. The muscles of the cervical spine are much smaller than your quads or chest, so jumping from 5kg to 10kg is a 100% increase. That's a recipe for injury. Aim for 1-2% increments instead. Use fractional plates or "micro-loading" to keep the stimulus consistent without overtaxing the tissue. Track your total volume by multiplying sets, reps, and load. If your total volume increases from 500kg to 510kg over a week, your programme is working.
Isometric Endurance Standards
Endurance is your first line of defence against fatigue-related injury. Set benchmarks of 30 and 60 seconds for lateral and rotational holds. Use a stopwatch to find your "break-point" fatigue; this is the exact second your form begins to waver or your chin starts to tuck. This data helps identify dangerous asymmetries. If your right lateral hold is 45 seconds but your left is only 30, you've found a 33% strength deficit that you must address to optimise your performance and reduce injury risk.
Qualitative Metrics: Stability, Posture, and Range of Motion
Raw numbers tell only half the story. To understand how to measure neck strength progress effectively, you must look at the quality of your movement and the structural integrity of your cervical spine. The "Tech Neck" audit is your first diagnostic tool. By taking a profile photo and measuring the horizontal distance from your ear canal to the centre of your shoulder, you can track structural changes over time. Clinical data suggests that for every 2.5 cm of forward head posture, the neck muscles must support an additional 4.5 kg of weight. Reducing this gap over a 12-week training block is a definitive sign of improved deep neck flexor recruitment and postural control.
This qualitative approach aligns with the guide for sports medicine clinicians, which emphasises that functional assessments often precede raw power gains. You should also track subjective markers like daily stiffness and tension headaches. A 50% reduction in the frequency of "desk-bound" neck pain indicates that your muscles are no longer in a state of constant guarding. When your nervous system feels secure, it allows for greater fluidity and less muscular tension during mundane tasks.
This concept of building functional confidence extends beyond the physical. For many international athletes and professionals, clear communication is another critical performance area. Structured programs like InPronunci offer targeted training to help non-native speakers achieve similar fluency and confidence in English.
Measuring Functional Range of Motion
Check your cervical rotation with a simple wall test. Stand with your back flat against a wall and rotate your head to the left and right. Progress is marked by your ability to touch your chin to your shoulder without your chest lifting or your shoulders rounding forward. Increased range of motion (ROM) suggests better muscle health and a nervous system that feels safe in end-range positions. For athletes in the UK, from rugby players to racing drivers, this mobility is the difference between seeing a threat in the periphery and being caught off guard.
Assessing Rotational Stability
The "Figure-8" test is the gold standard for tracking proprioception, which is your brain's ability to sense head position. Move your head in a slow, controlled infinity loop while under light resistance from a band or machine. When you're learning how to measure neck strength progress, pay close attention to any "shaky" zones or stuttering movements. These dead spots suggest neural inhibition or weak stabilisers that aren't firing correctly. Smooth movement through a full range is often a better indicator of functional strength than the raw weight you can move. Consistent training should eliminate these shaky zones within 6 to 8 weeks, resulting in a head that feels "locked in" even under external chaos.
For sports scientists and elite athletes interested in the neural basis of this motor control, the next frontier is direct measurement. To see how researchers are using high-performance neural interfaces in this field, you can discover MindRove.
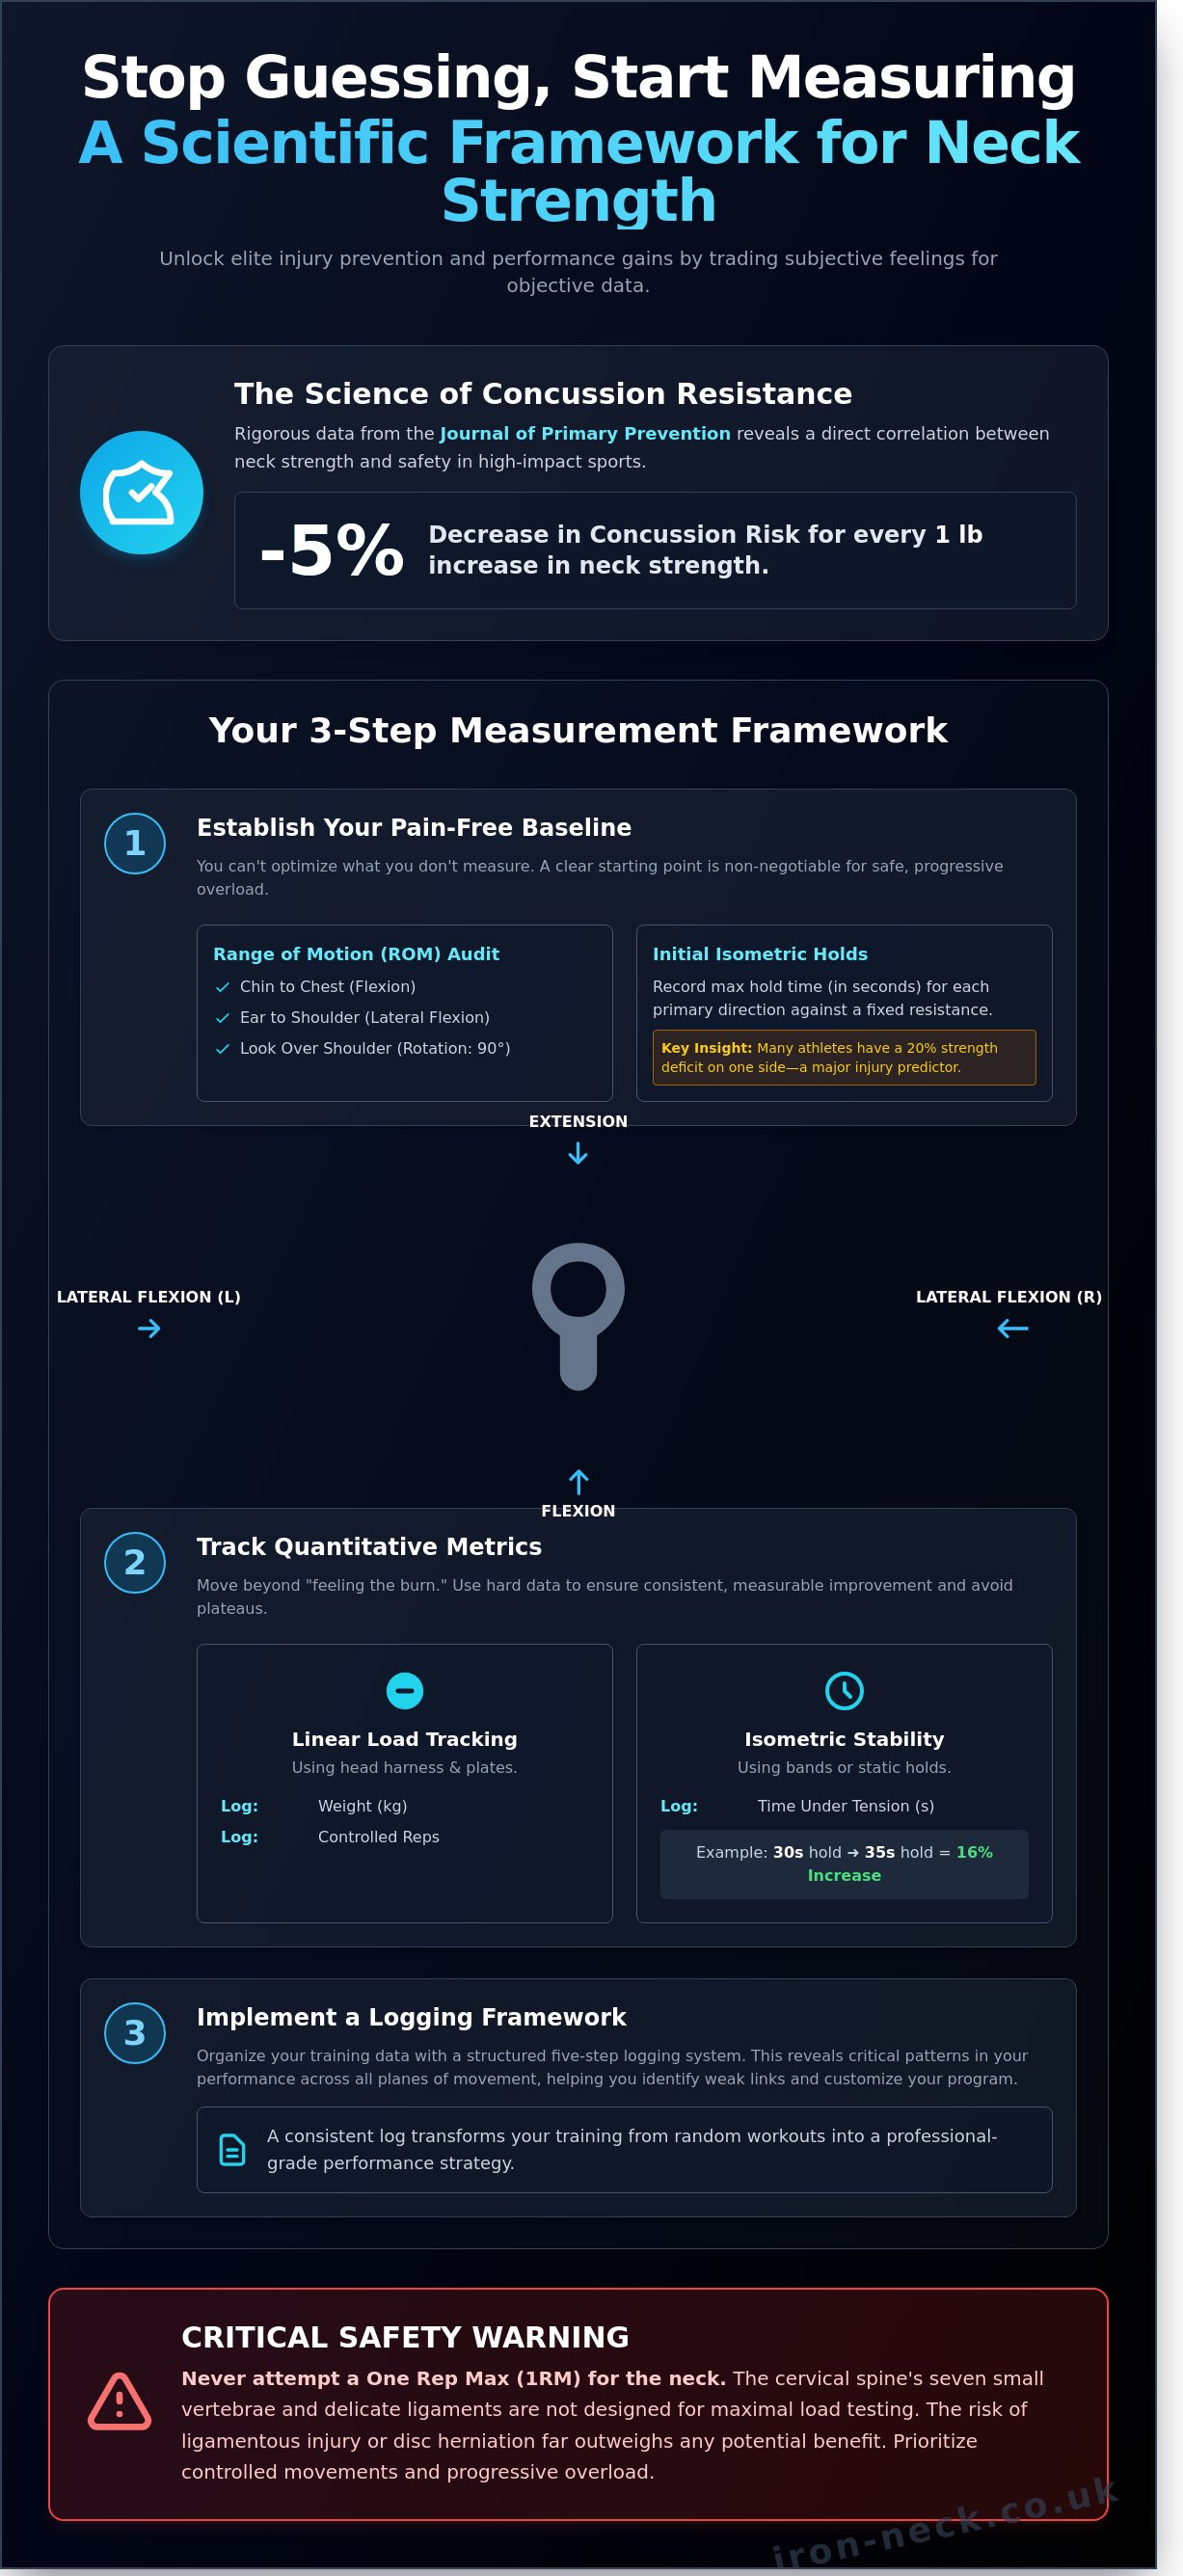
Creating Your Neck Strength Log: A 5-Step Framework
Data transforms a casual workout into a scientific programme. To understand how to measure neck strength progress, you must move beyond "feeling stronger" and start recording objective metrics. Organising your data reveals patterns in your performance that would otherwise go unnoticed. This is a critical component of how to measure neck strength progress over time, ensuring you aren't just moving weight, but building functional resilience.
- Step 1: Record Weekly Volume. Document every set and repetition across flexion, extension, and lateral rotation. Total volume (sets x reps x resistance) should ideally increase by 5% to 10% every fortnight.
- Step 2: Assign an RPE Score. Note your "Rate of Perceived Exertion" on a scale of 1 to 10 for every session. If the same resistance feels like a 6 today but was an 8 last month, you've made neurological gains.
- Step 3: Conduct Monthly Isometric Tests. Once every 30 days, perform a "Max Isometric Hold" for all four planes. Aim for a 30 to 60-second hold at a specific resistance level to measure endurance capacity.
- Step 4: Perform Video Analysis. Use your phone to check for compensatory movements like shrugging or leaning. Form breakdown is a signal that the load is too high for the target musculature.
- Step 5: Execute a 4-Week Audit. Review your trends every month. If your volume has plateaued for 21 days, it's time to adjust your resistance levels or change your exercise selection.
The Weekly Training Diary
Consistency is your most valuable asset. Record your data at the same time, such as 08:00 every Monday morning, to account for diurnal variations in spinal hydration. Tracking your "recovery feel" is vital to protect the suboccipital muscles. These small muscles at the base of the skull are prone to overtraining if volume increases too rapidly. Use specific Iron Neck Resistance Bands to ensure your load variables are precise rather than estimated. This precision allows you to spot fatigue before it leads to a setback.
Using Video for Form Analysis
Your eyes can deceive you; high-definition video won't. Set your phone to record at 60 frames per second from a side-on profile. This perspective reveals if you're maintaining chin-tuck integrity or if your upper trapezius is shrugging to compensate for weak deep neck flexors. Elite athletes often find that while their resistance increases, their range of motion decreases. Video evidence helps you catch these "cheats" early. It also provides a visual record of postural improvements, such as a 2-centimetre reduction in forward head carriage over a 12-week period.
The Iron Neck Advantage in Measuring Progress
Traditional methods like manual resistance or weighted harness systems often lack the precision required for professional-grade data. The Iron Neck halo system changes this by providing a 360-degree feedback loop. This allows you to identify specific weak points in your range of motion that linear exercises miss. When you're learning how to measure neck strength progress, consistency is everything. The Iron Neck provides a stable platform where variables are controlled, making your data reliable. It bridges the gap between clinical rehabilitation and high-performance athletic training by offering a standardised way to track every degree of movement.
Variable Friction: The Secret Metric
The variable friction dial is a powerful tool for quantifiable tracking. By adjusting the dial from "0" to "Max," you increase the torque required to rotate your head. This isn't just about feeling stronger; it's about hard data. For example, if you could only complete 5 "360 Spins" at 50% friction last month and can now perform 12 at the same setting, you've achieved a 140% increase in rotational work capacity. Friction-based training removes the erratic momentum found in gravity-based weights. This makes it a safer, more precise way to scale intensity. You can track your journey from a baseline of zero friction during early-stage rehab to the high-torque demands of professional rugby or motorsport.
Integrated Performance Tracking
Most gym equipment forces a choice between isometric holds or concentric movement. The Iron Neck integrates both into a single session. You can measure your ability to maintain a neutral spine against linear band tension while simultaneously overcoming rotational friction. This dual-loading protocol is why coaches call it the "Missing Link" in strength and conditioning. It transforms your neck training from a guessing game into a scientific discipline. You're no longer just moving a weight; you're mastering proprioception and force production across all planes.
Understanding how to measure neck strength progress requires tools that test your limits safely. By recording the specific band tension (e.g., a 25lb Orange Band at 2 metres) alongside your friction setting, you create a repeatable benchmark. This data-backed approach ensures you aren't just exercising, but actively evolving your physical capacity. To upgrade your training environment and move beyond guesswork, shop the Iron Neck range to start measuring your performance today.
Master Your Performance Metrics
Building a resilient cervical spine requires more than just effort; it demands a systematic approach to data. By establishing a clear baseline and following a structured 5-step framework, you turn abstract goals into measurable gains. Understanding how to measure neck strength progress through both quantitative load tracking and qualitative assessments of posture ensures you're building a foundation that lasts. Consistency is your greatest asset in this process.
The Iron Neck provides the missing link for athletes who refuse to leave their safety to chance. It's the only system featuring 360-degree multi-directional training, a capability that has made it a staple for every NFL team and thousands of elite professionals. Scientific research indicates that increasing neck strength can reduce concussion risk by 5% for every pound of strength gained. Don't settle for outdated methods when you can utilise the same technology trusted by the world's most demanding sports organisations.
Invest in the Iron Neck and take the guesswork out of your training. You've got the data and the strategy. Now, it's time to put them into practice and unlock your full athletic potential.
Frequently Asked Questions
How often should I test my maximum neck strength?
Test your maximum neck strength every 8 to 12 weeks. Testing more frequently risks central nervous system fatigue and provides insufficient time for measurable tissue adaptation. A 2021 study on elite athletes showed that a 10 week training block is the minimum threshold to see measurable isometric force production increases. Stick to a consistent protocol, such as a 5 second maximal isometric hold, to ensure your data remains reliable over time.
Can I use a standard tape measure to track neck muscle growth?
You can use a standard tape measure to track hypertrophy, but it doesn't measure functional force. While a 43 centimetre neck is often a target for front-row rugby players, size is only one metric. Track your circumference at the mid-neck level, just above the Adam's apple, every 4 weeks. Use this alongside load data to ensure you aren't just gaining mass without the "Missing Link" of functional stability and performance.
What is a "good" neck strength standard for rugby players?
Elite rugby players should aim for a neck strength ratio where they can resist 15% to 20% of their total body weight in all four planes of movement. A 2016 study published in the Journal of Primary Prevention found that for every 0.45kg increase in neck strength, concussion risk decreases by 5%. In the UK, professional academies often look for players who can maintain peak isometric force for 10 seconds without any postural collapse.
Is it normal for one side of my neck to be stronger than the other?
It's common to have slight strength discrepancies, but a difference of more than 10% between the left and right sides increases injury risk. This imbalance often stems from dominant hand usage or previous cervical spine injuries. Use a handheld dynamometer or resistance bands to quantify the gap. If your left side is 15% weaker, prioritise unilateral exercises to stabilise the cervical spine and ensure your foundation for all movement is secure.
What is the best way to measure neck mobility at home?
The most effective way to measure neck mobility at home is by using the "Wall Rotation Test" and a smartphone clinometer app. Sit with your back flush against a wall and rotate your head slowly to each side. You should achieve 80 to 90 degrees of rotation without your shoulders lifting. Measuring this every 2 weeks helps you understand how to measure neck strength progress without sacrificing the range of motion required for elite performance.
Can I measure progress if I only do bodyweight neck exercises?
You can track bodyweight progress by measuring total time under tension and increasing the difficulty of the leverage. If you start with a 30 second isometric hold and progress to 60 seconds over 4 weeks, you've improved your muscular endurance. However, to truly understand how to measure neck strength progress, you eventually need quantified resistance. Bodyweight exercises are a foundational starting point, but they lack the objective data provided by specialised equipment.
How do I know if I am overtraining my neck muscles?
You're likely overtraining if you experience persistent morning stiffness, a 15% drop in grip strength, or radiating pain during sessions. The cervical muscles are high in slow-twitch fibres but still require 48 to 72 hours of recovery between high-intensity bouts. If your progress plateaus for more than 21 days despite consistent effort, scale back your volume by 30% to allow the nervous system to recalibrate and recover.
Does a thicker neck always mean a stronger neck?
A thicker neck doesn't always correlate with higher force production or better concussion resistance. Hypertrophy focuses on muscle cross-sectional area, while true strength relies on neurological efficiency and proprioception. You might see a 2 centimetre increase in size without a corresponding 10% jump in isometric strength. Focus on the quality of the movement and the ability to stabilise the head under explosive loads rather than just chasing aesthetic gains.